Moreover, BSOD is a prevention step that’s programmed in Windows to prevent computers from getting damaged beyond repair. Kernel, one of the essential components of Windows, is programmed to detect problems with computers. And in some mishaps like overheating, the PC will crash to prevent the CPU or any other component from becoming obsolete.
What Causes Kernel Mode Heap Corruption Error?
How to Fix “Kernel Mode Heap Corruption Error”
There is a handful of possible fixes that could be applied to solve various BSOD problems including “Kernel Mode Heap Corruption Error”. Here are the best ones you could try.
Faulty Driver: The “Kernel Mode Heap Corruption Error” is generally caused by faulty/outdated graphics drivers. In some cases, forcefully installing the latest version of the drivers that were meant for some other graphics card could trigger this issue. Corrupted Files: Corrupted OS files are common and they could also trigger this error. And since Kernel is an integral part of the operating system, detecting corrupted files that may cause damage to other data is a part of its job. And upon detecting such files, the system goes into BSOD. Malicious Files: Aside from the corrupted files, malware and virus-infected files could prevent important programs from running. And in such a case, the kernel acts aggressively and causes the system to crash. Hardware Acceleration Issue: In rare cases, hardware acceleration could be the culprit behind the issue. However, turning off the hardware acceleration could fix it. Failing Hardware: Faulty graphics cards could also be the cause behind the “Kernel Mode Heap Corruption Error”. In such a case, try running a stress test on your computer to see how the GPU responds. If there’s something fishy going on with the GPU, the PC will crash and the BSOD will appear.
Updating Graphics Drivers
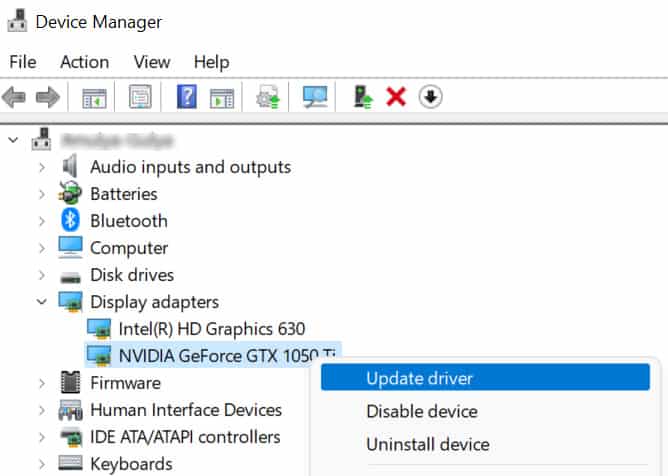
It is observed that the “Kernel Mode Heap Corruption Error” occurs if the graphics driver is outdated. There’s a simple solution for that and it is to update the graphics drivers to the latest version. Perform the following steps to update the graphics drivers to their latest version: The updating process will get underway. However, in some cases, the computer can’t locate the latest versions of the drivers and says that the drivers are already updated. In such a case, users will have to manually update their graphics drivers.
Updating AMD drivers
If you have an AMD graphics card installed on your computer, you can update the drivers from “AMD Radeon Software”. Alternatively, you can also download the latest version of the drivers from AMD’s official website as well. Before manually installing the drivers, make sure to read the release notes to check the compatibility of the drivers. Installing the wrong drivers could have worse implications.
Updating NVIDIA Drivers
Users who have Nvidia’s GPU installed on their computers can download the latest version of the drivers from Nvidia’s official website. However, if you can’t locate drivers for your GPU, we recommend using Driver Booster to get the latest version drivers.
Rolling Back Drivers
Sometimes installing the latest versions of the graphics drivers or any other drivers could trigger the BSOD. In such a case, rolling back to the earlier version of the drivers could solve the issue. To perform a roll-back, perform the following steps: The process will take a few minutes to complete. Afterward, restart the PC and if the problem persists, keep on reading.
Restoring to an Earlier Time
A series of updates and installations could corrupt certain OS files that could also lead to this problem. In such a case, restoring the PC to an earlier time is likely to fix the issue for you. While installing new drivers, Windows often creates a restore point where users can restore their previous settings. In order to restore the PC to an earlier time, perform the following steps: The recovery process will be underway. However, if your PC isn’t eligible, users will have to reset their PC to factory settings.
Scanning with System File Checker
Corrupted files are often the culprit behind the problem. Fortunately, scanning the OS files and fixing the corrupted ones is likely to solve the issue for you. The OS files could get corrupted by malicious software or during regular Windows Update. However, using Windows’s very own “System File Checker” or (SFC) will sort the issue. To scan the system for corrupted files, perform the following steps:
Press Start and search for ‘CMD’.Right-click on ‘CMD’ and select ‘Run as Administrator.Afterward, insert this command: sfc/scannowand press enter.
The process will take a few minutes. In some cases, it may even take more than an hour to find and scan all the files on the computer. Furthermore, for some computers the SFC command is unsuccessful and in such a scenario, run this command:
Dism /Online /Cleanup-Image /RestoreHealth and hit enter.
Running these commands will do a deep dive on the hard drive and will fix all the corrupted OS files that might be causing the “Kernel Mode Heap Corruption Error”.
Check the Event Viewer for Additional Information
When a computer crashes and BSOD appears, there’s a crash log saved on the “Event Viewer” that can tell you more about the underlying issues. The cause of the “Kernel Mode Heap Corruption Error” could be located in the event viewer. To open the event viewer and locate the cause of the BSOD error, perform the following steps: More on the cause of the crash could be discovered by researching the “Event ID” of the error. For instance, if there’s something wrong with the hard disk that’s causing the kernel failure, the Event ID would show the number ‘11’ and ‘disk’ under the source tab. Moreover, if you’re seeing different Event IDs or source names, research it over the internet to discover where the problem lies.
Run Windows Memory Diagnostic Tool
A defective piece of RAM could also be the cause behind kernel failure. To detect and resolve the problems with your RAM, Windows Memory Diagnostic Tool is used. It is an effective tool that can troubleshoot problems with the RAM. To run Windows memory diagnostic tool, perform these steps:
Deep Scan
Malicious software and viruses could duplicate many programs. And cause the memory to be occupied to its neck, resulting in BSOD with kernel failure. In such a case, running a deep scan to look for malware is essential and could fix the problem for good.
Eliminating/Blocking Conflicting Programs
Similarly, the duplicated and malicious programs running in the background could also be located in Task Manager. To eliminate them for good, perform the following steps:
Check Slots of the Graphics Card and the Memory
The PCIe slot where the graphics card is installed could be faulty. And in such cases, BSOD and random crashes are quite common. Especially when someone is doing GPU-intensive tasks like playing games or rendering 3D media. To ensure that the graphics card is installed properly and there isn’t any sagging, make sure to check the integrity of the PCIe slot. Similarly, the slots of the RAM sticks could’ve been clogged with dirt or if the RAM sticks aren’t installed properly, the problem with kernel failure could occur. In such a case, make sure to clean the RAM slots and try replacing the RAM sticks to resolve the problem.
Hard disk Corruption
With time, hard disks get worn out and lose a major part of their health. In such a scenario, the BSOD occurs quite often. If you have been using the same hard disk for many years then we recommend checking the health of your hard disk. Users can check the health of their hard disk using HardDiskSentinel. In case the disk has lost most of its health, we recommend backing up the data and replacing it with a new one.
Disable Overclocking
Overclocking your GPU to get those extra frame rates is common among gamers. However, it could pose a threat to the PC if it isn’t done right. And boosting up all the stats to ensure flawless gameplay could also cause internal issues and cause BSOD to occur frequently. If you’ve overclocked the cores on your graphics card, we recommend taking it down a notch and opting for the standard factory settings to resolve the “Kernel Mode Heap Corruption Error”.
Clean Boot
Disabling all the 3rd-party software installed on the computer could solve the issue with the kernel failure. Any underlying issues of any of the active applications could trigger the kernel failure error. However, disabling them could resolve the problem.
Disable Hardware Acceleration
Hardware acceleration is another factor that could contribute to the “Kernel Mode Heap Corruption Error”. Fortunately, turning it off could solve this BSOD for you. To disable hardware acceleration, perform the following steps:
Final Words
All the troubleshooting steps mentioned above are likely to fix the “Kernel Mode Heap Corruption Error”. In a rare case, if nothing works for you, we recommend installing a fresh batch of Windows, changing the RAM positions, and doing a stress test on GPU to see if it has any faults. In case none of this helps, we recommend asking for Microsoft’s help to resolve the problem with the BSOD issue.