By default, there are several ways to shutdown a Window computer: click on Start and Turn Off Computer/Shut Down, press CTRL + ALT + DEL and choose Shut Down, open the command prompt and type in the shutdown command, or install a third party application that shuts down the computer for you. In this article, I’ll cover each method and see how we can block the shutdown. Note that your mileage will vary depending on what version of Windows you have. If you are running a Home or lower edition version of Windows, all of the options below will not be available.
Remove Shutdown Options
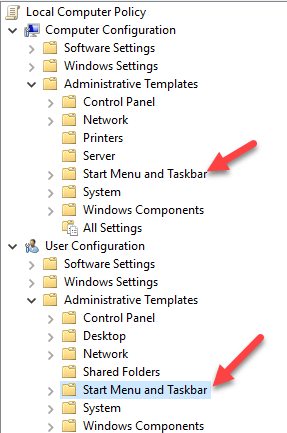
First, you can remove the Turn Off Computer button from the Start Menu and from the CTRL + ALT + DEL screen by using the Group Policy Editor. Note that this is editor is not available in Windows Home or Starter editions. Click on Start, type in gpedit.msc and press Enter. In the left pane, expand User Configuration and then expand Administrative Templates. Finally, click on Start Menu and Taskbar. Note that you can also go to same location under Computer Configuration if you want the setting to apply to all users on the computer.
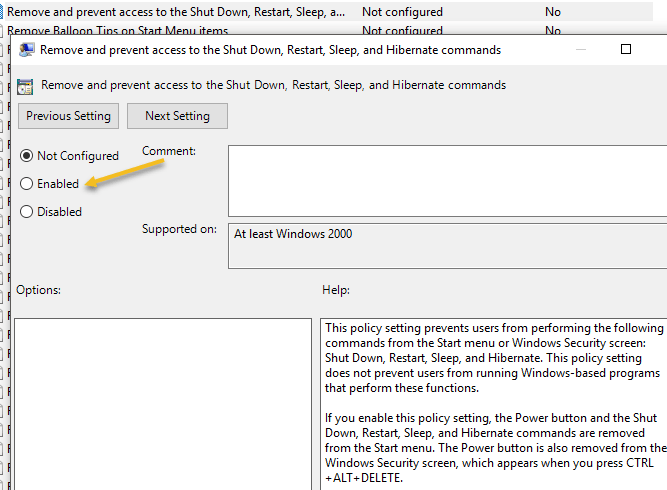
Now on the right pane, double-click on Remove and prevent access to the Shut Down, Restart, Sleep and Hibernate commands and set it to Enabled. You’ll notice in the description that this will remove the shutdown option from the Start Menu and Task Manager.
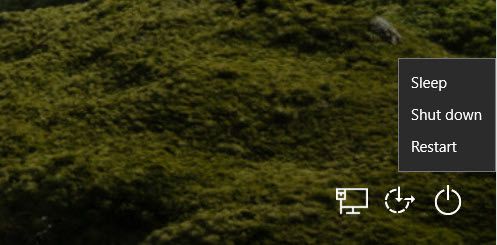
However, a user could still simply log off of Windows and then click the Power button from there, which remains even after enabling the setting above.
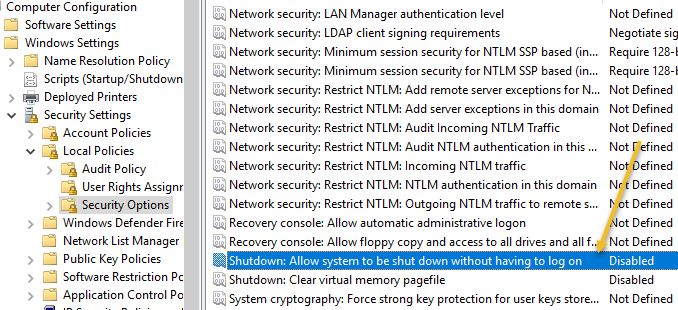
To prevent this, you need to find the Remove Logoff on start menu setting in the same section and change it to Enabled also (only under User Configuration). Now the user won’t be able to log off and won’t be able to reach that screen. However, if the computer restarts for any particular reason, the login screen will appear and the computer can be shut down. To prevent this scenario, you can also configure Group Policy to only allow shutdown of the computer when someone is logged on. Computer Configuration – Windows Settings – Security Settings – Local Policies – Security Options and scroll down to Shutdown: Allow the system to be shutdown without having to log on and set it to Disabled.
Finally, you need to prevent people from going to the command prompt and simply typing in shutdown! To do this, go to the following policy: User Configuration – Administrative Templates – System and double-click on the Prevent access to the command prompt policy and set it to Enabled.
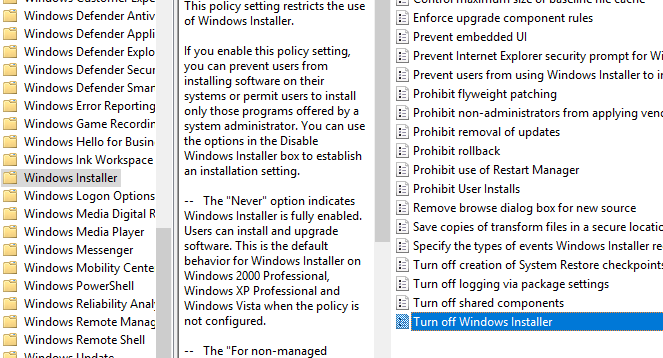
Note that everything in the User Configuration section will apply to all users, even the Administrator account, so be careful and make sure you leave an option for restoring access if needed. What I normally do is leave the option for the Run command in the Start Menu so that I can get access to Group Policy later on. If you remove that option also, then you’ve basically locked yourself out. There is a way to apply local group policies to all users except the Administrator account, but it requires quite a few steps. Microsoft has written up a knowledgebase article on exactly how to do it. Lastly, to prevent users from installing third-party programs to shutdown the computer, you can create a standard (non-administrative) user account in Windows. The standard account does not have permission to install software most of the time. If you really want to prevent any kind of software installation, go to the following policy: Computer Configuration – Administrative Templates – Windows Components – Windows Installer and click on Disable Windows Installer or Turn off Windows Installer.
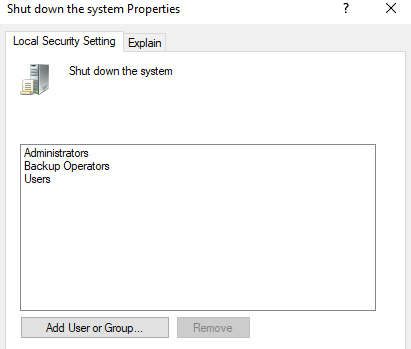
Set it to Enabled and choose Always from the drop down box. Note that standard user accounts also cannot access the Group Policy editor, so that’s another good reason to use a non-administrative account. Having the user logged in as a standard user will also ensure that someone cannot use the remote shutdown command in Windows to shutdown the computer. Finally, as a extra backup, you can also make sure that the shutdown privilege is taken away from normal user accounts. You can do this by going to the following policy: Computer Configuration\Windows Settings\Security Settings\Local Policies\User Rights Assignment\ and clicking on Shut Down the System.
By default, you’ll see a couple of groups already listed here, depending on what version of Windows you are running. The easiest thing to do is to remove the Users group and leave the rest. That way, you’ll have the shutdown privilege, but normal users will not. Even if they manage to figure out some way to send the shutdown signal to Windows, it’ll be blocked by this policy. That is about all the different ways a Windows computer can be shut down, so hopefully this covers everything. Again, this will only work on Pro or higher versions of Windows. If you have any questions, post a comment. Enjoy!
