Your device can search for other devices and services on the internet only through their unique IP addresses. However, since IP addresses are difficult to remember and organize, all systems use domain names for convenience. So, DNS is basically a phonebook for the internet. Normally, your ISP automatically designates the DNS servers you need for the domain name resolution. However, it is also possible to manually set static DNS server addresses. In this article, we talk in detail about how you can change DNS on a Windows PC.
Why Should I Change DNS in Windows?
How to Change DNS in Windows
There are mainly three ways to change DNS in Windows. They provide the same result, so you can pick any method you want. After changing the DNS, we recommend flushing your DNS cache to prevent internet connectivity issues.
With Settings App
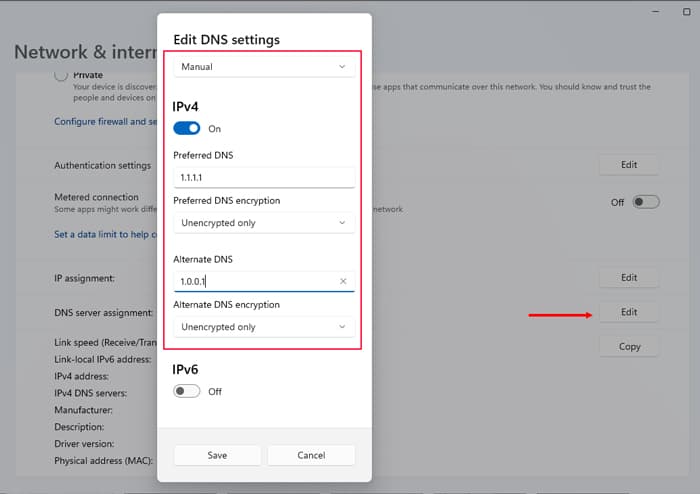
The usual way to change your system and other settings, including DNS, on later Windows versions is with the Settings app. You can also choose to encrypt your DNS for more security using this method. To change the DNS server address through the Settings,
Through Network Connections Control Panel
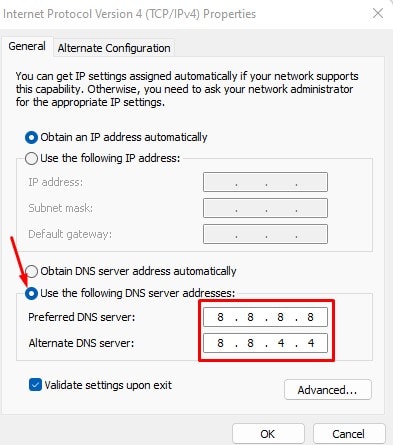
The Control panel is the traditional alternative to Settings. You can also use it to change the DNS server addresses on Windows. Here’s how you can do so:
Using Command-line Interface
If you are familiar with Command-line Interfaces, you will likely find it more convenient to use such interfaces to change your DNS address. There are different commands you need based on whether you are using Windows PowerShell or Command Prompt. On Command Prompt On Windows PowerShell You can enter the DNS servers for either IPv4 or IPv6 on the same command.
Which DNS Addresses Should I Use?
We recommend using public DNS servers as manual DNS addresses. Many public DNS are available for your use, such as: Use the first address in the Preferred DNS address and the second one under Alternate DNS Addresses. Cloudflare OpenDNS
How to Change to Automatic DNS (DHCP) in Windows?
The default protocol for obtaining automatic DNS servers or IP addresses is called DHCP (Dynamic Hosts Configuration Protocol). If you want to revert back your DNS configuration to automatically get DNS server from your ISP, you need to enable this protocol for your DNS settings. You can follow the similar steps to the above and select automatic DNS assignment options using Settings and Control Panel. However, the commands for the CLIs are slightly different.
Using Settings
Here are the steps to enable DHCP for automatic assignment of DNS by using the Settings app:
Through Control Panel
Here’s how you can use the Control Panel to set automatic allocation of DNS server in Windows:
With Command-line Interface
Here are the steps to enable DHCP using the Command-line Interfaces on Windows OS: On Elevated Command Prompt
The syntax is netsh interface <ipv4/ipv6> set dnsservers
On Elevated Windows PowerShell
The syntax is Set-DnsClientServerAddress
Related Queries
How to Change DNS in Mac?
Follow the instructions below to change DNS in Mac,
How to Change DNS in Android?
Follow the steps below to change DNS in Android phones:
How to Change DNS in iPhone?
Here’s how you can change DNS on an iPhone or an iPad: