Many Google Pixel 2 owners still don’t know how to master the camera and they’re missing out. There are some options available to Google Pixel 2 owners that most users aren’t taking advantage of. In this guide, we explain all of these features so that you can get the most out of the camera on your smartphone.
Mastering the Google Pixel 2 Camera App
Google has put a lot of effort into building a powerful, intelligent camera app that can learn about how to take the right kind of pictures in different scenarios. For this reason, the Google Pixel 2 camera app is one of the best point and shoot cameras in the world. There aren’t many manual settings because you don’t usually need them. Simply aim your camera at something like below and press the shutter button.
For the most part, that’s all you need to do. The powerful Pixel AI camera chip will do most of the hard work for you. There are, however, a few settings that can enhance your experience whilst using the Google Pixel 2 camera app. One feature that I really like is the new Show dirty lens warning. By default, this is set to off, so you’ll have to go into settings to enable it. But I can’t tell you how many times I’ve had to tell my parents to clean the lens before taking pictures! This will help them take better photos. There are a lot of other great features, which we’ll go through below.
Touch Up Your Selfies
The Google Pixel 2 has one of the most powerful selfie cameras in the world. You can turn on the portrait mode to create professional level portrait images in seconds. Simply open the camera, then tap the menu button in the top left and tap portrait.
Next, focus the camera on your face or somebody else’s, tap the person’s face on your screen, let it focus, and press the shutter button. Also, in the latest update to the camera app, you can now change how the double-tap works. By default, it zooms in, but you can go into settings and change it to switch camera. This is great for people who like selfies and want a quicker way to switch cameras.
Adjust Focus and Exposure
The Google camera AI is usually very good at picking what object to focus on, but you can easily change it by tapping on areas on your screen. By doing this, the camera will readjust its focus to the area you’ve tapped.
You can also adjust the exposure of an image. If too much light is bleeding through, or the image isn’t bright enough, the exposure setting can help.
Tap on the area you’d like to add focus, and then use the slider that appears on the right side of the screen. Sliding up adds more light and sliding down darkens the image.
Use Google Smartburst to Pick Out The Best Photos
Sometimes, it can be hard to find the highest quality photo, especially if there’s motion involved. With Google Smartburst, you can let AI pick out the best shots. To use Smartburst, take multiple shots and then tap the circular image icon in the bottom right corner.
Next, tap the Smartburst icon in the center at the bottom of the screen.
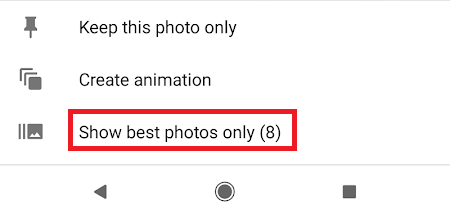
After that, tap ‘show best photos only’. This will showcase the images that the camera AI thinks are the best.
Finally, scroll through the images and tap to delete the images you don’t want to keep.
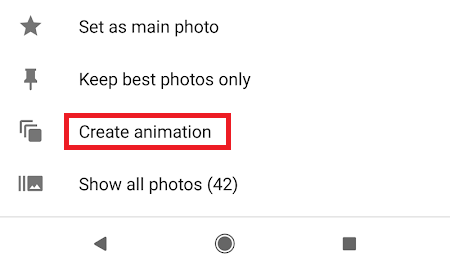
You can also create an animation out of the images you’ve just created. Tap the smartburst icon again and tap ‘create animation’.
This will create a small looping video file of your photos that can be shared on Instagram or other social media platforms.
Best Settings for Google Pixel 2 Video Recording
Now that we’ve taken a look at taking still shots on the Google Pixel 2, let’s now look at setting up the best settings for video recording.
Improve Frame Rate
You can improve the Google Pixel 2 frame rate by tapping the ‘30’ icon in the top left corner. You can then choose between 30 frames per second and 60 frames per second.
Keep in mind that 60 frames per second will mean you cannot record in 4K.
Record in 4K
To record in 4K, you must first change your frames to 30. Next, tap the menu button in the top left corner. Next, tap settings.
In the settings menu, scroll down to the video section and tap back camera video resolution. Tap to change it to UHD 4K (30fps).
Tips for Recording Video on the Google Pixel 2
Recording video on the Google Pixel 2 is quite straightforward. Thankfully, the camera software will do most of the work for you. Stabilization techniques are used to keep the footage from looking shaky, but you can create even smoother video footage by steadying your hand whilst recording. If you’re serious about creating good video content with your smartphone, consider purchasing a smartphone gimbal. They can set you back around $100, but they’ll help you to stabilize your video footage and create professional-quality content.
Conclusion
In summary, the Google Pixel 2 camera is so powerful because the AI and software that powers it does an incredible job at automating most tasks. For the most part, simply pointing your camera at what you want to capture is all you need to do. What are your thoughts on the Google Pixel 2 camera? Do you have any questions about it? If you do, make sure to leave a comment below and we’ll get back to you. Enjoy!
![]()
![]()
![]()
![]()
![]()
![]()

![]()

![]()
![]()