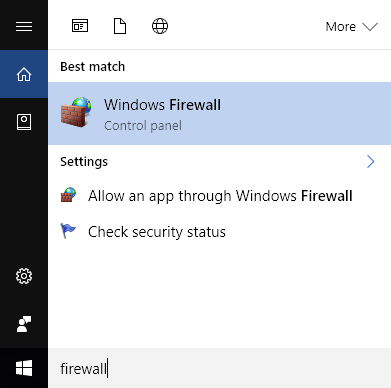
In this article, I’ll go through the various options and settings for the Windows 10 firewall and talk about how you can adjust them to suit your needs. Even though outbound connections are not blocked by default, you can configure your own firewall rules in Windows 10 to block outbound connections. This can be useful if you want to block a specific program from being able to communicate with the Internet, even if the program gets installed without your consent. To get started, let’s talk about how to bring up the firewall settings in Windows 10. You can either open the Control Panel and open the firewall from there or you can click on Start and type in the word firewall.
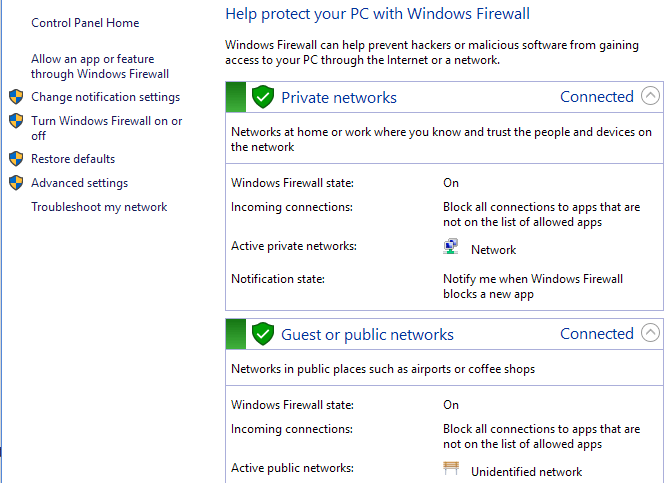
This will bring up the Windows Firewall dialog where you can control all of the various settings for the firewall.
On the right hand side, it splits the view into Private networks and Guest or public networks. Your home wireless network should show up under Private networks, but if it doesn’t, then you will probably have to manually tell it that the network is a Home network and not a Public network.
Allow Program through Firewall
The main reason most people will ever mess with the firewall is to allow a program to work through the firewall. Normally, this is automatically done by the program itself, but in some cases, you have to do it manually. You can do this by clicking on Allow an app or feature through Windows Firewall.
As you can see, for each program or feature of Windows, you can choose to allow incoming connections on the private and public networks separately. This separation is handy for things like File and Printer Sharing and HomeGroups since we don’t want someone from public WiFi to be able to connect to a network share or a local HomeGroup. To allow an app, simply find it in the list and then check the box for which type of network you want to allow incoming connections on. If the app is not listed, you can click on the Allow another app button and pick from a list or click the Browse button to find your program specifically. If the button is greyed out, click on Change settings first.
If you go back to the Firewall home dialog, there is another link on the left-hand pane called Turn Windows Firewall On or Off. If you click on that, you’ll get a set of options like shown below:
You can turn off the firewall in Windows 10 entirely, but that will allow everything through the firewall. You can also block all incoming connections to your computer, even for allowed apps, which is useful in certain situations. For example, if you are in a public setting like a hotel or airport and you want to be extra safe while connected to the network. You can still browse the Internet using a web browser, but no program will be able to create an incoming connection from another computer on the local network or from a server on the Internet.
Advanced Firewall Settings
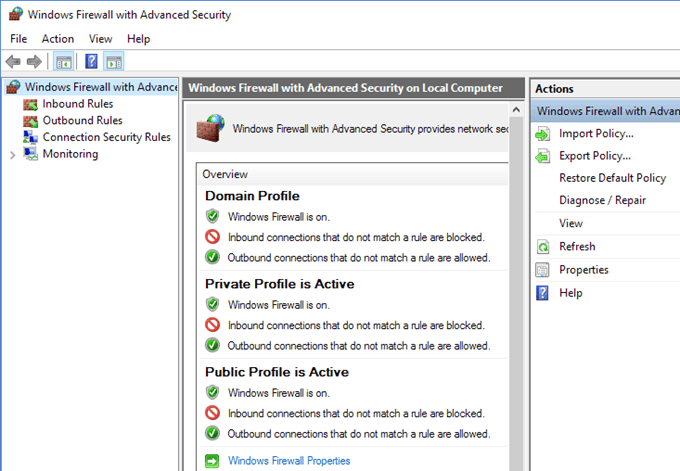
The real fun, though, is if you want to mess around with the advanced firewall settings. This is obviously not for the faint of heart, but it’s also not a big deal because you can click the Restore Defaults link and set everything back to the way it was when you first installed Windows 10. To get to the advanced settings, click the Advanced settings link in the left-hand pane on the firewall main dialog. This will bring up the Windows Firewall with Advanced Security window:
On the main screen, it gives you a quick overview of your firewall settings for the domain, private networks, and public networks. If your computer is not joined to a domain, you don’t have to worry about that profile. You can quickly see how inbound and outbound connections are managed by the firewall. By default, all outbound connections are allowed. If you want to block an outbound connection, click on Outbound Rules in the left-hand column.
Go ahead and click on New Rule and then you’ll get a dialog asking what type of rule.
I chose port because I want to block all outgoing connections on port 80, the HTTP port used by every web browser. In theory, this should block all Internet access in IE, Edge, Chrome and other browsers. Click Next, select TCP and type in the port number.
Click Next and choose the action you want to perform, in my case, Block the connection.
Finally, choose which profiles you want the rule to apply too. It’s probably a good idea to just pick all the profiles.
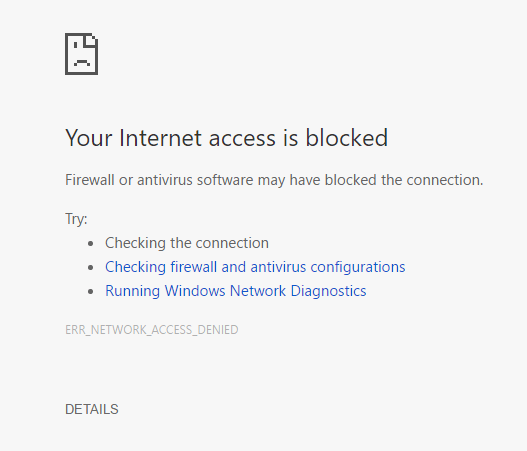
Now just give it a name and that’s it! When I open Chrome to visit any webpage, I get the following error message:
Sweet! So I just created a new outbound connection rule in Windows 10 firewall that blocks port 80 and therefore prevents anyone from browsing the Internet! You can create your own custom firewall rules in Windows 10 following the steps I showed above. Overall, that’s pretty much all there is to the firewall. You can do more advanced stuff, but I wanted to give a decent overview that even non-technical people can try to follow. If you have any questions about configuring the firewall in Windows 10, post a comment here and we’ll try to help. Enjoy!